
Boarding Form Templates
Configure appearance, behavior, and branding for Preczn-hosted boarding forms
Form templates control the appearance and behavior of your boarding forms—logo, colors, return URLs, expiration settings, field customization, and optional features like terms acceptance and auto-submit. Create templates in the Dashboard or through the API, and reference them when generating form links.
Prerequisites
Before creating a form template, you need a configured domain. See Configuring Domain Names for DNS and SSL setup instructions.
Creating a Template
Via Dashboard:
- Navigate to Settings → Boarding Forms
- Click "Create Template"
- Configure the template settings (described below)
- Save the template
Via API:
Send a multipart/form-data request to POST /v1/formTemplates. Every value is a string part, including booleans ("true") and numbers ("48"). Upload the logo and favicon as file parts.
curl -X POST https://api.preczn.com/v1/formTemplates \
  -H "x-api-key: $PRECZN_API_KEY" \
  -F "name=Standard Onboarding" \
  -F "domain=https://boarding.yourplatform.com" \
  -F "returnUrl=https://yourplatform.com/onboarding/complete" \
  -F "expirationUrl=https://yourplatform.com/onboarding/expired" \
  -F "expirationInHours=48" \
  -F "displayTos=true" \
  -F "tosUrl=https://yourplatform.com/terms" \
  -F "autoTransmitMerchantData=false" \
  -F "headingTitle=Your Platform Name" \
  -F "headingTitleColor=#1A1A1A" \
  -F "headingAccentColor=#0066CC" \
  -F "buttonTextColor=#FFFFFF" \
  -F "buttonAccentColor=#0066CC" \
  -F "supportUrl=https://yourplatform.com/support" \
  -F "[email protected]" \
  -F "supportPhone=18005551234" \
  -F "supportText=Available Monday-Friday, 9am-5pm EST" \
  -F "banking.attachments.bankStatement.displayAttributes.subText=Upload an unlocked PDF. Password-protected files can't be processed." \
  -F "[email protected]"
Field customization parts use dotted names, such as banking.attachments.bankStatement.displayAttributes.subText. The dots are part of the name, not nested objects. To change an existing template, send only the parts you want to change to PATCH /v1/formTemplates/{id}. See Boarding Forms API Reference for every part.
Customization Scope
Boarding forms support branding, field customization, and support contact information, but the form's steps and their order are determined by connection requirements.
What you can customize:
- Logo, favicon, and title
- Colors (title, accent, buttons)
- Return and expiration URLs
- Support contact information
- Form expiration duration
- Terms of service display
- Which fields and documents appear, length and character rules for some fields, and dropdown options (see Field Customization)
- Subtext under fields and document uploads (see Subtext)
What is fixed:
- Form sections and their order
- Field labels and input types
- Form layout and styling (no custom CSS)
- Required vs optional field behavior
Need additional customization?
If you have a customization need that isn't currently supported:
-
Small enhancements - Reach out to your Preczn contact. We're always evaluating ways to expand form customization options. Since boarding forms are shared infrastructure, we consider how changes benefit all platforms when prioritizing enhancements.
-
Bespoke requirements - For highly customized merchant experiences, we recommend building your own forms using the Onboarding API. This gives you complete control over the user experience while Preczn handles the data storage, validation, and processor submission.
Template Configuration
Required Settings
| Field | Description |
|---|---|
| name | Template name—displayed in the browser tab and used to identify the template in the Dashboard |
| domain | Your configured domain (e.g., https://boarding.yourdomain.com). Must be set up before creating the template. |
| returnUrl | URL where merchants are redirected after completing the form |
| expirationUrl | URL where merchants are redirected when accessing an expired form |
| expirationInHours | Hours until form links expire (1-2160, default: 24) |
| displayTos | Whether to show the Terms & Conditions section in the form |
Branding (Heading)
Customize the form header appearance. API part names are in parentheses.
| Field | Description | Default |
|---|---|---|
| logo | Your logo image (JPG or PNG, up to 2 MB; 250×100 pixels recommended). Displays at up to 160×40 pixels in the sidebar, so a wide logo reads best. | — |
| favicon | Icon shown in the merchant's browser tab (ICO, PNG, or SVG, up to 64×64 pixels and 512 KB) | — |
heading.title (headingTitle) | Title displayed under your logo | — |
heading.titleColor (headingTitleColor) | Hex color for the title | #4014BE |
heading.accentColor (headingAccentColor) | Hex color for the current step, completed step icons, and other highlights | #4014BE |
Button Styling
Customize the primary button, such as Save & Continue. API part names are in parentheses.
| Field | Description | Default |
|---|---|---|
button.textColor (buttonTextColor) | Hex color for the primary button's text | #EDF0F5 |
button.accentColor (buttonAccentColor) | Hex color for the primary button's background | #4014BE |
What Merchants See
On a computer, your logo and title sit at the top of a sidebar on the left. The sidebar lists the form's steps, including one row for each connection, and has a Help button at the bottom. Back, Save Draft, and the primary button, such as Save & Continue, sit in a bar fixed to the bottom of the screen. On phones and tablets, the logo and title move to a header at the top of the page.
This example uses heading.accentColor #2F6B3B (green), heading.titleColor #1F3D25, button.accentColor #9A3412 (rust), and button.textColor #FFFFFF:
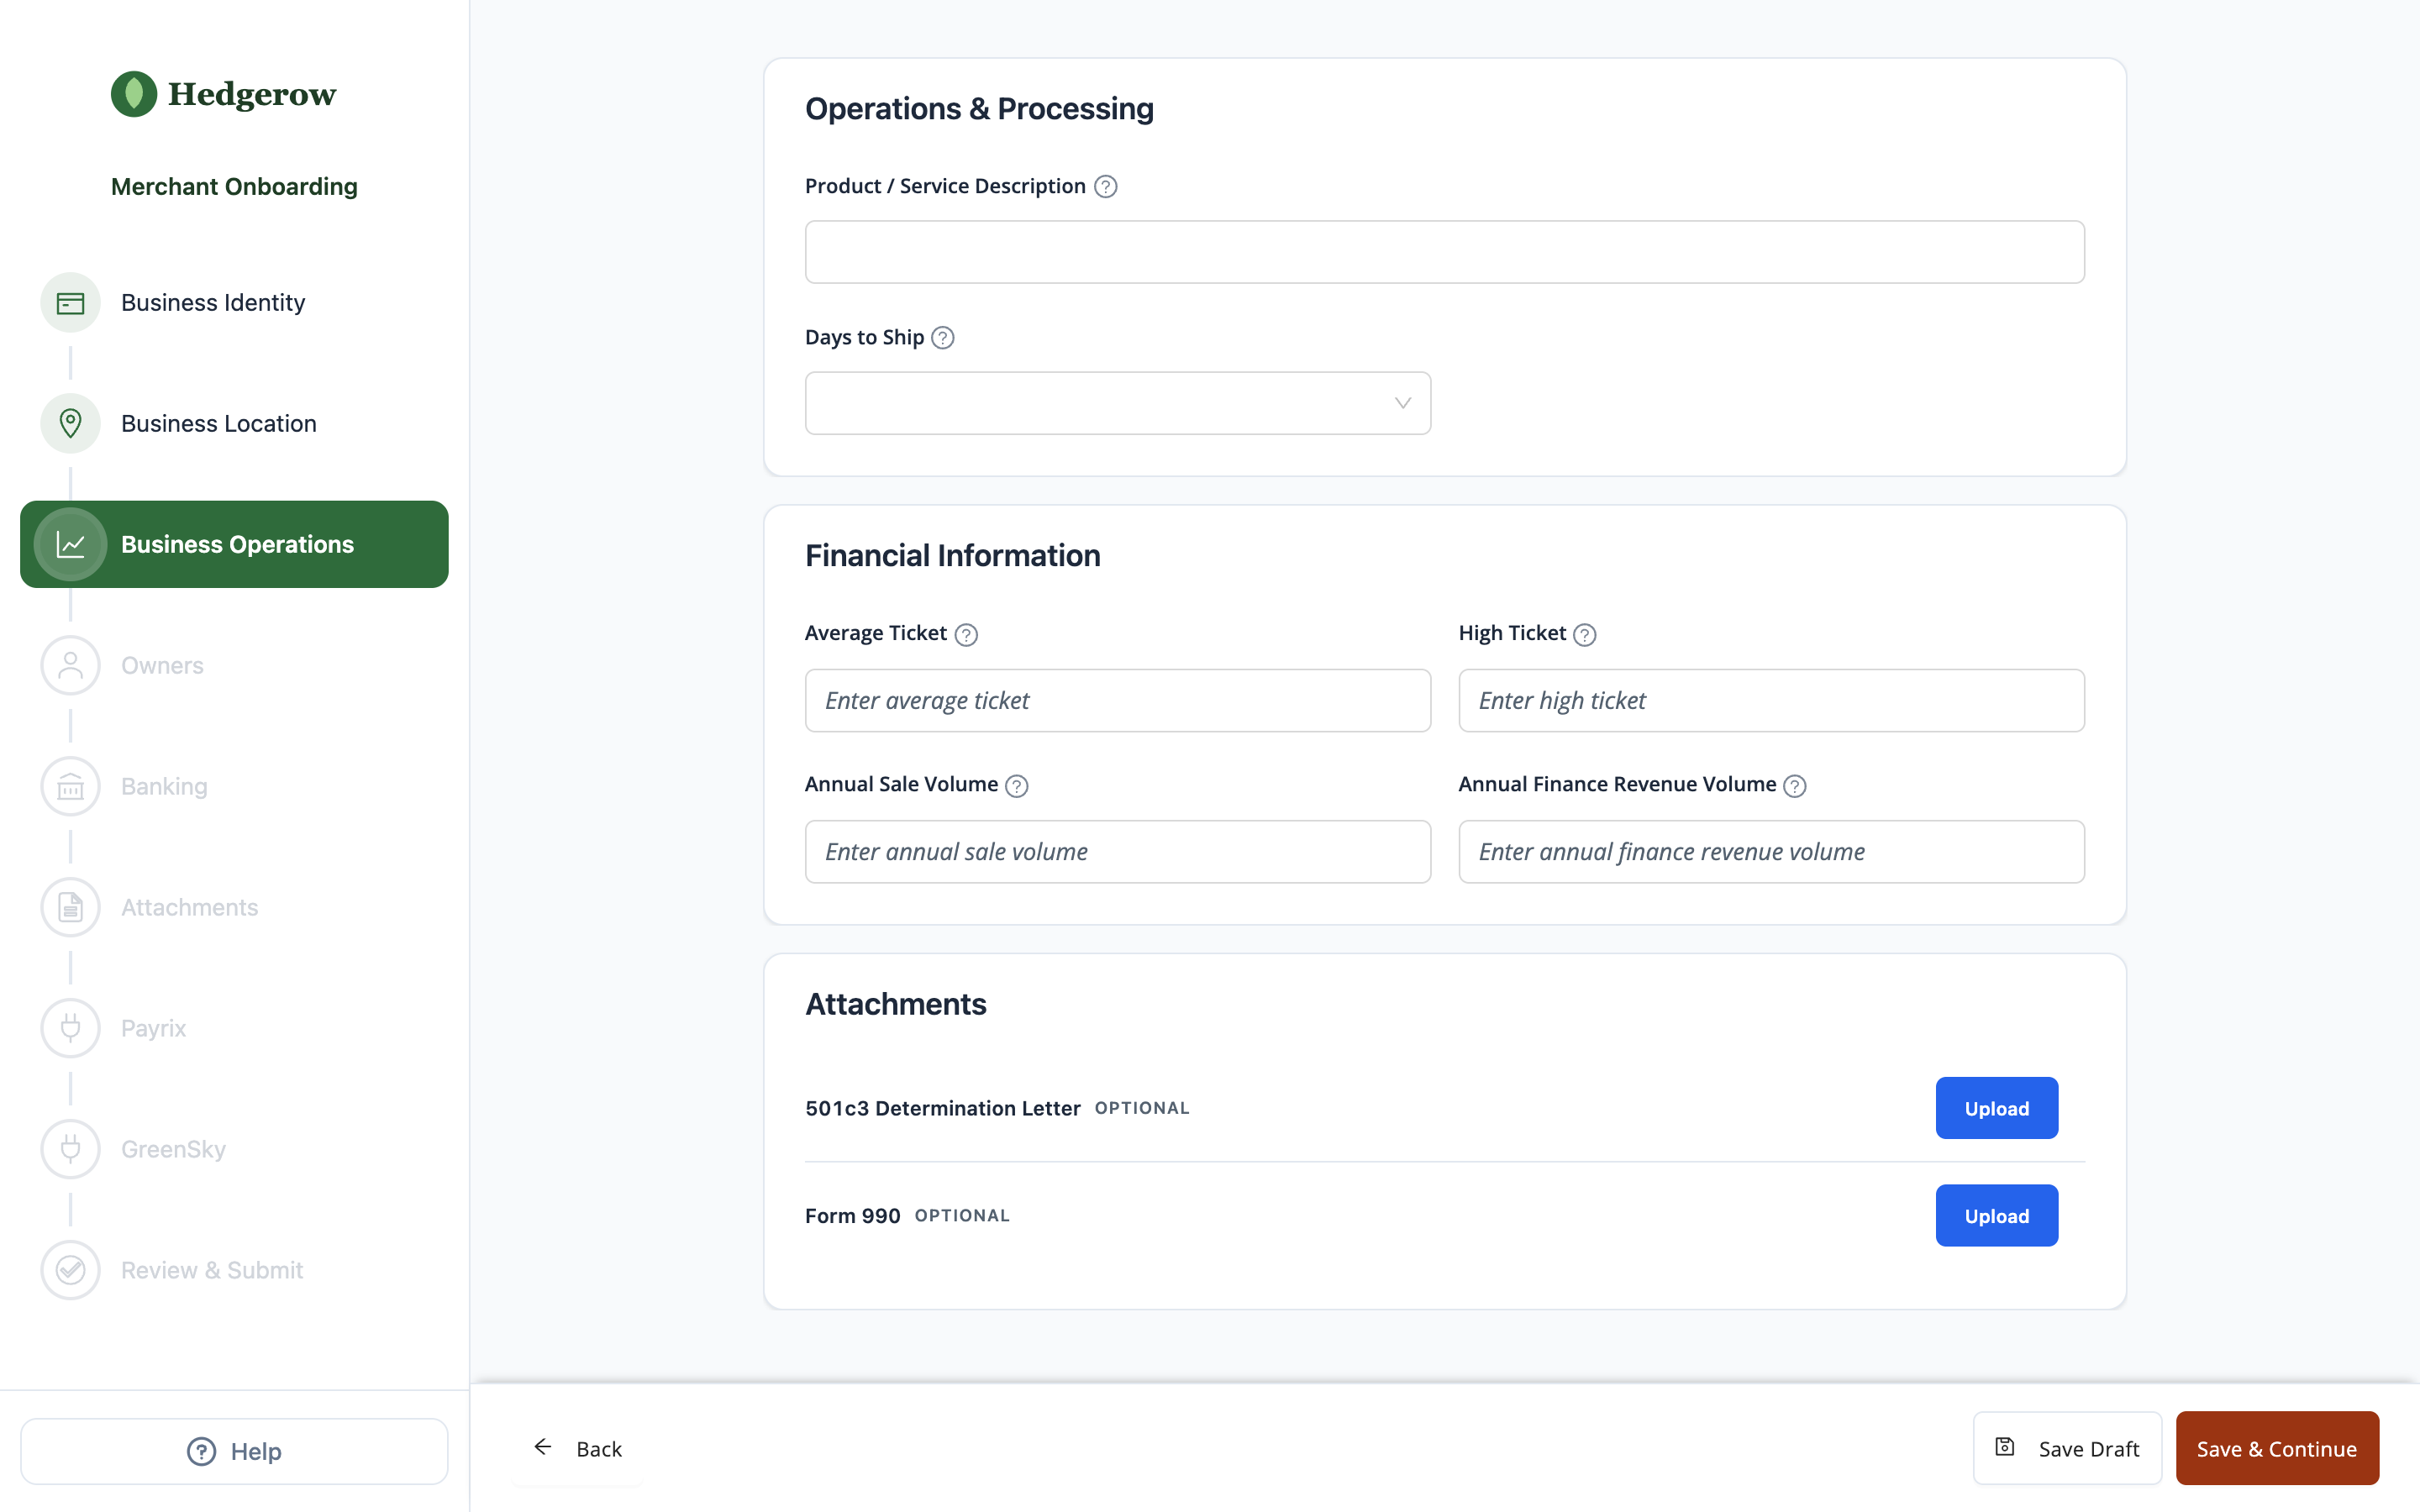
Check your colors for contrastThe current step always shows white text on
heading.accentColor. Choose an accent color dark enough for white text to stay readable, and abutton.textColorthat contrasts withbutton.accentColor.
Optional Features
| Field | Description | Default |
|---|---|---|
| type | Form type: KYC or RFI. You can also set it on each form. See Form Types. | KYC |
| tosUrl | URL to your platform's terms of service (displayed alongside processor terms) | — |
| autoTransmitMerchantData | Automatically initiate onboarding when merchant submits the form. See Auto-Transmit Behavior. | false |
| displayNewUserLogin | Show Account Login section for processor account creation (connection-specific) | false |
| displayPciSaq | Show the PCI Compliance step for connections that support it | false |
| mccCodes | Override your platform's default MCC codes—comma-separated list (e.g., 8699,5733) | Platform default |
| naicsCodes | Override your platform's default NAICS codes—comma-separated list (e.g., 238220,811310) | Platform default |
Support Information
Configure the help modal that merchants can access during form completion. API part names are in parentheses.
| Field | Description |
|---|---|
support.url (supportUrl) | Support website URL |
support.email (supportEmail) | Support email address (opens merchant's email client) |
support.phone (supportPhone) | Support phone number (11 digits, no formatting—e.g., 15551234567) |
support.text (supportText) | Additional text displayed in support modal (e.g., "Support available 9am-5pm EST") |
If no support fields are configured, the Help button doesn't display on the form.
Merchants open the support modal from the Help button. On a computer, the button sits at the bottom of the sidebar. On phones and tablets, it sits in the header. The modal shows support.text first, then one button for each channel you configure:
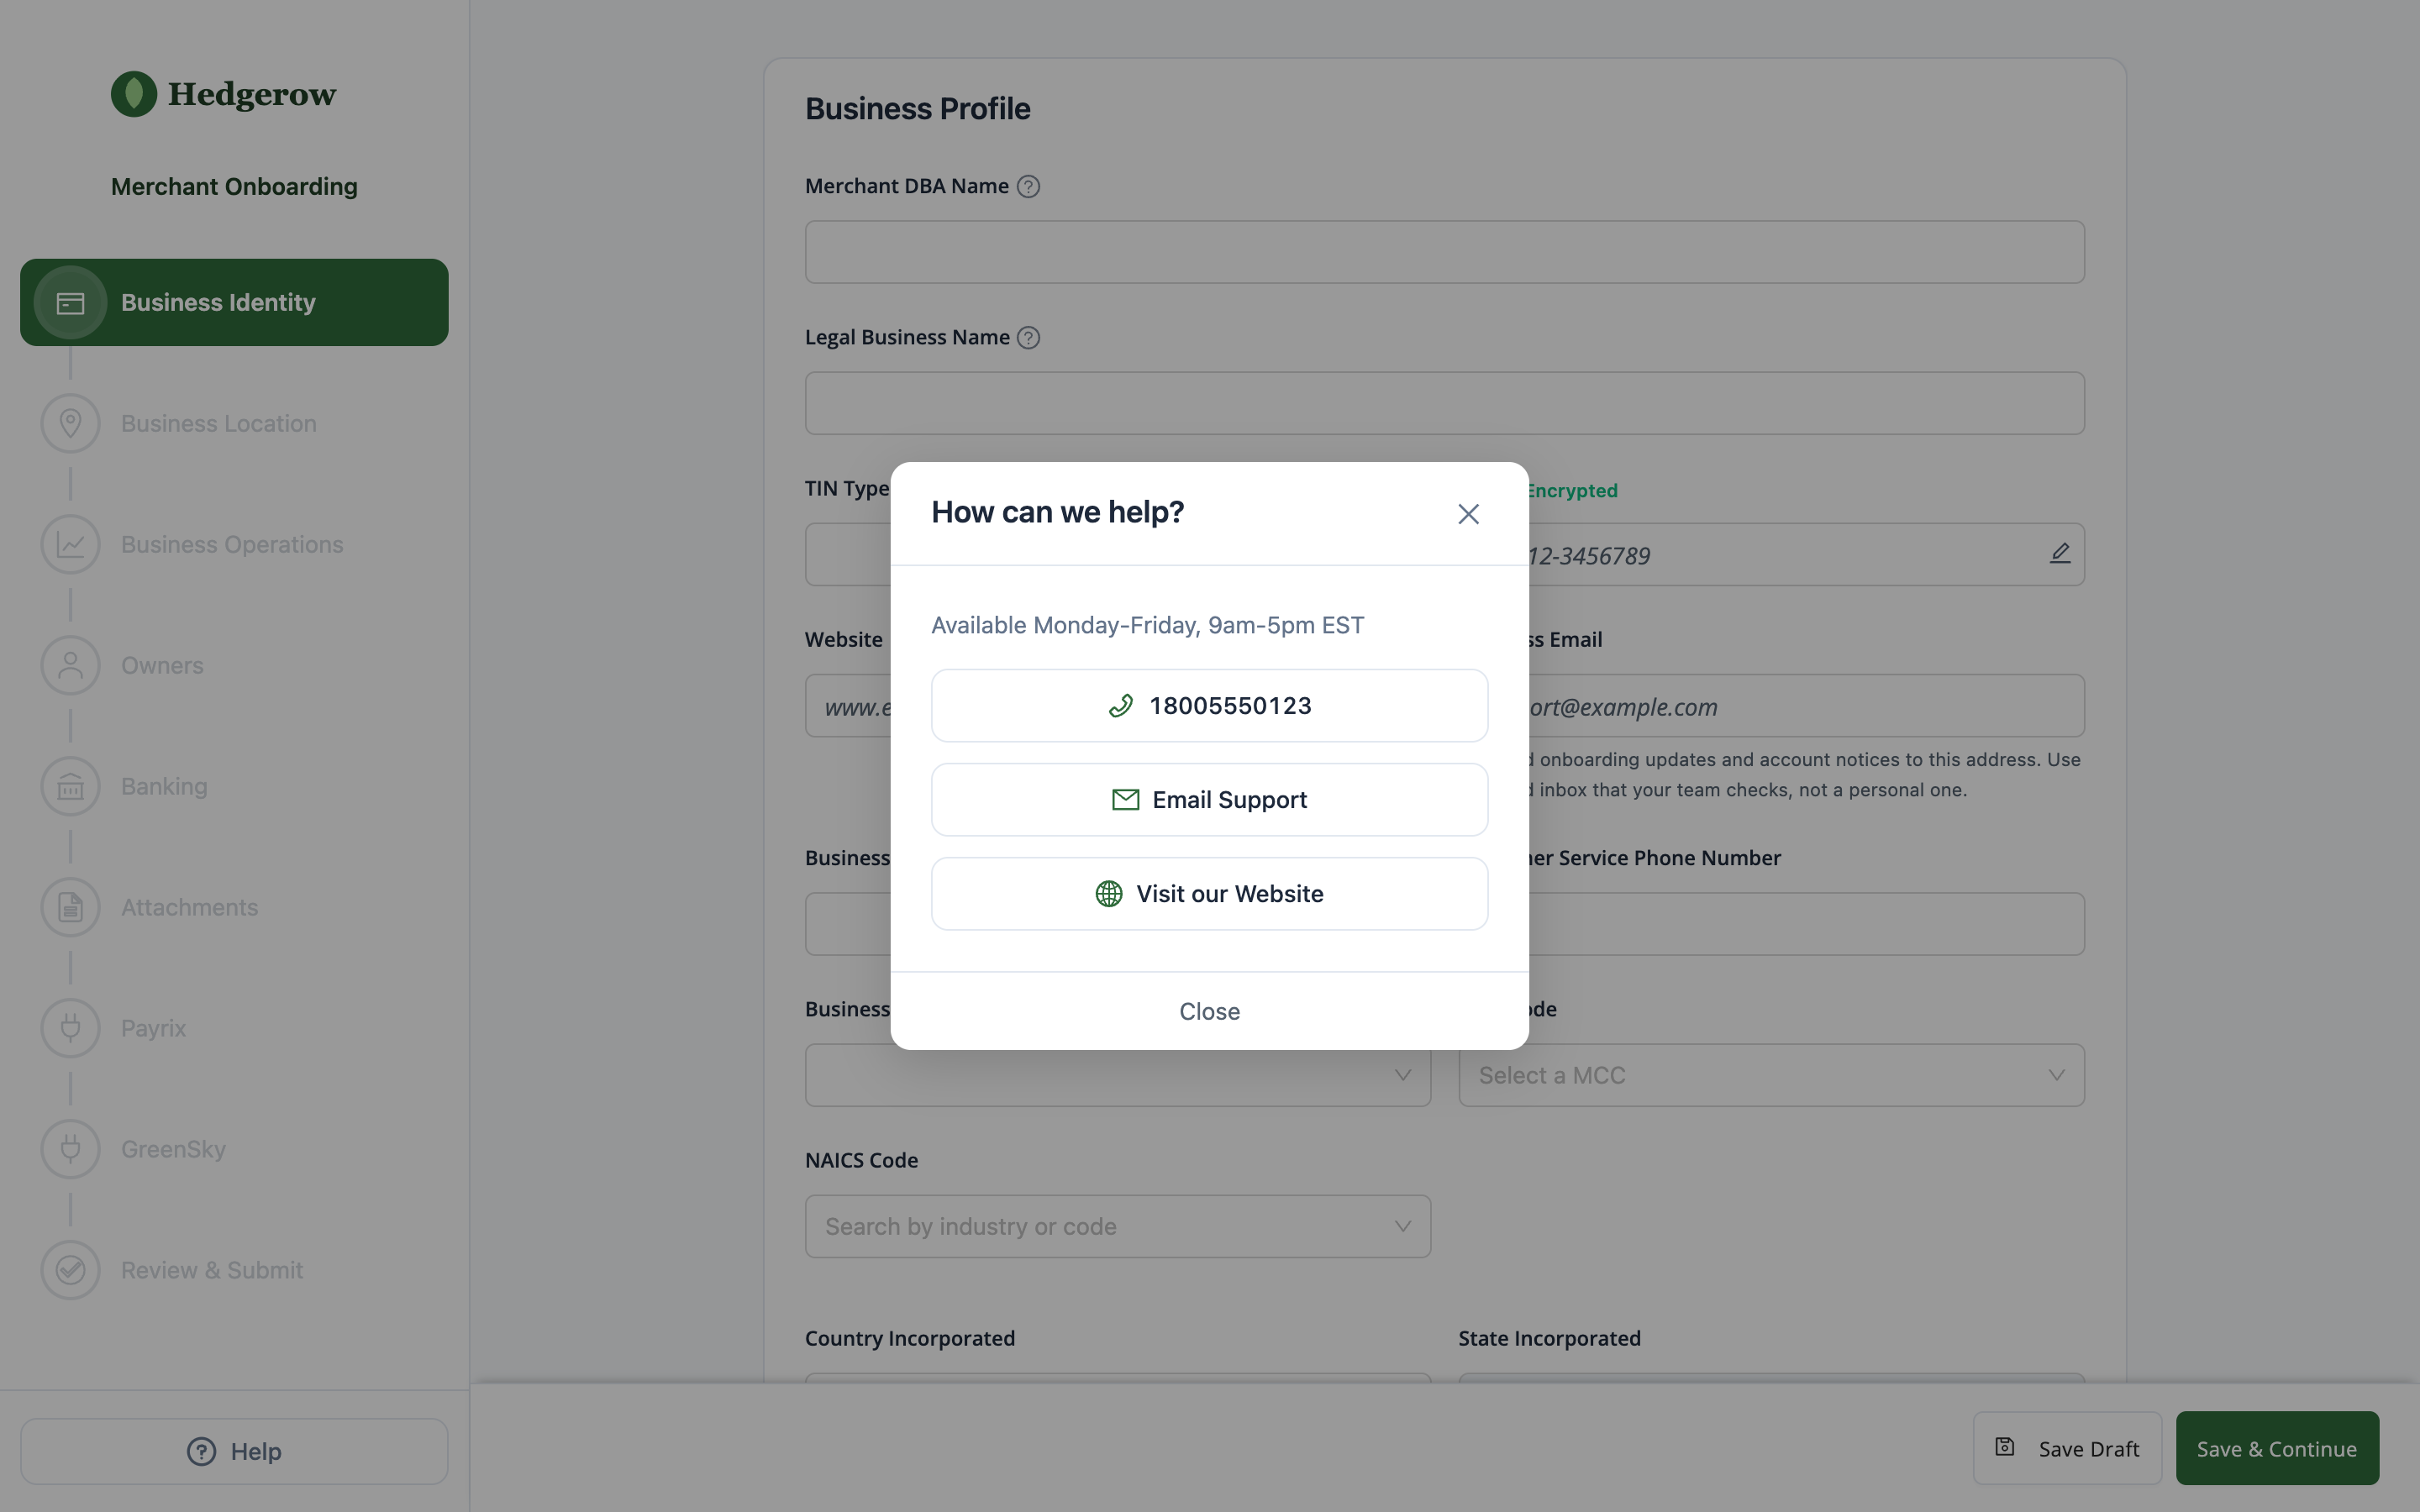
The phone number appears exactly as you enter it, so merchants see the 11 digits without formatting. Email Support opens the merchant's email client, and Visit our Website opens support.url in a new tab.
Field Customization
Use the Field Customization tab on a template to control which fields and documents merchants see, set rules for some fields, and add subtext. Through the API, send the matching dotted parts, such as businessInfo.fields.website.display.
Showing and Hiding Fields
The Field Customization tab lists every field and document on the form. Turn each one on or off, or use Show All and Hide All. Through the API, send <field>.display as "true" or "false".
Whether a field is required comes from your connections, not from the template. Only hide fields that your connections don't require.
Field Rules and Dropdown Options
Some fields accept extra rules:
- Length and character rules: Set a minimum and maximum length, and whether letters, numbers, spaces, or specific special characters are allowed. These rules are available for Merchant DBA Name, Legal Business Name, TIN, Website, Product / Service Description, the owner's Business Title, and Driver License Number. When you set a length through the API, send
fieldConstraints.minLengthandfieldConstraints.maxLengthtogether. - Dropdown options: Limit the choices merchants see for Business Type, TIN Type, owner type, bank Account Type, bank Country, and GreenSky Business Category.
Subtext
Subtext is a short line of guidance that you add under a field or document upload. Field labels are fixed, so subtext is how you tell merchants what your platform needs from that field: which value to enter, what to avoid, or why a document is worth uploading.
Adding Subtext
Via Dashboard:
- Open the template under Settings → Boarding Forms.
- Select the Field Customization tab.
- Select the field or document.
- Enter your guidance in Helper Text.
- Save the template.
Via API: Send the subtext as the field's displayAttributes.subText part when you create or update a template. For example, banking.attachments.bankStatement.displayAttributes.subText.
Like other template settings, subtext applies only to forms created after you save it. See Template Inheritance.
Where Subtext Appears
Subtext renders in small, muted text. Its position depends on the element.
Input fields: Subtext appears directly below the input. While the field shows a validation error, the error replaces the subtext. The subtext returns when the merchant fixes the error.
Document uploads: Subtext appears under the document name, below the default description that Preczn provides for that document type. Your subtext adds to the default description and doesn't replace it. For example, a Bank Statement upload with subtext looks like this:
Set As Primary Account: On the Banking step, subtext appears below the checkbox label:
Subtext doesn't appear on the Review step or in the upload dialog.
Length and Wrapping
Subtext has no character limit. Long subtext wraps onto as many lines as it needs. It is never cut off or hidden behind a scroll bar, so a long message pushes the fields below it further down the page.
How many lines a message takes depends on its length and the space available. Fields that share a row with another field are about half as wide as full-width fields, and phone screens are narrower still. This table shows approximate line counts:
| Subtext length | Phone | Half-width field | Document upload | Full-width field |
|---|---|---|---|---|
| About 45 characters (a short sentence) | 1 | 1 | 1 | 1 |
| About 70 characters (one sentence) | 2 | 1 | 1 | 1 |
| About 120 characters (two sentences) | 3 | 2 | 1 | 1 |
| About 200 characters (three sentences) | 4 | 3 | 2 | 2 |
| About 300 characters (a paragraph) | 6 | 5 | 3 | 3 |
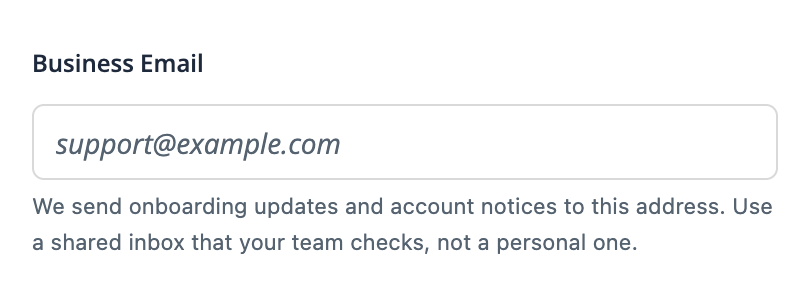
For example, this 125-character message under Business Email, a half-width field, takes two lines on a computer and three lines on a phone:
Recommended length:
- Aim for one sentence of about 70 characters or fewer. It fits on one line in every field on a computer and takes at most two lines on a phone.
- Keep to about 120 characters (two sentences) at most. It still fits on one line for full-width fields and document uploads on a computer, but takes three lines on a phone.
- Avoid 200 characters or more. On a phone, a message this long takes four or more lines and pushes the rest of the step down. Use the Welcome Section for longer instructions.
Validation errors replace subtext while they show, and an error is usually one line. With long subtext, the fields below move up when an error appears and back down when the merchant fixes it.
Writing Subtext
- Use plain text. Subtext doesn't render Markdown, HTML, or links, and line breaks are removed.
- State what the merchant does or avoids, not what the field is. The label already names the field.
- For document uploads, don't repeat Preczn's guidance. The upload dialog already lists each document's requirements, such as how recent it must be and which details must match. Add only what your platform needs beyond that.
Encouraging optional information: When a field or document is optional for your connections but still helps your underwriting team, use subtext to ask for it anyway. Your subtext tells the merchant why it's worth providing. Merchants who supply it up front are less likely to get a follow-up request later. Only promise a faster review when that's true for your underwriting process.
Examples
These examples come from common onboarding questions and processor review requirements.
| Field or document | Example subtext | Why it helps |
|---|---|---|
| Business Apartment, Suite, etc. | Suite or unit number. Don't enter a PO box. | Merchants sometimes put a PO box in this field. See Addresses and Locations. |
| Merchant DBA Name | The name customers see on receipts and card statements. Not your personal name. | Merchants sometimes enter their personal name instead of the business name. |
| Merchant DBA Name (Adyen for Platforms) | The first 22 characters appear on customer card statements. | Adyen for Platforms uses the first 22 characters of the DBA name as the card statement name. |
| Bank Statement | Upload an unlocked PDF. Password-protected files can't be processed. | A locked PDF fails and the merchant has to upload again. |
| Driver License Number (optional) | Recommended: providing this can speed up your review. | Collects identity details that underwriting may otherwise request later. |
| Bank Statement (optional) | Recommended: uploading a statement now can speed up your review. | Collects a document that underwriting may otherwise request later. |
| Set As Primary Account | Used by connections that accept a single account, such as GreenSky. | Explains when the primary account matters. |
Template Inheritance
When you create a form, it inherits all configuration from the specified template at that moment. You can also override any property at form creation time—the template simply provides defaults.
flowchart TD
    subgraph TEMPLATE ["TEMPLATE"]
        T1["returnUrl: /success"]
        T2["expiration: 24hrs"]
    end

    subgraph CREATE ["CREATE REQUEST"]
        C1["merchantId"]
        C2["expiration: 72hrs"]
    end

    subgraph RESULT ["FINAL FORM"]
        R1["returnUrl: /success"]
        R2["expiration: 72hrs"]
    end

    TEMPLATE -->|"1. Copy"| RESULT
    CREATE -->|"2. Override"| RESULT

    style T2 fill:#ffcccc,stroke:#cc0000,stroke-width:2px,color:#000
    style C2 fill:#ccffcc,stroke:#009900,stroke-width:2px,color:#000
    style R2 fill:#ccffcc,stroke:#009900,stroke-width:2px,color:#000
The template default (24hrs, red) is replaced by the override (72hrs, green). All other properties inherit unchanged.
How it works:
- You create a template with your standard settings (branding, URLs, expiration, etc.)
- When generating a form link, you reference the template ID
- The form inherits all template properties as a snapshot
- You can override any property in the form creation request
Example: Your template sets expirationInHours: 24, but for a specific merchant you need more time. Pass expirationInHours: 72 when creating the form to override just that property—all other template settings are inherited.
Point-in-Time InheritanceTemplate properties are copied to the form when the form is created. If you update a template, existing forms are not affected—they retain the configuration from when they were generated. Only forms created after the template update will use the new settings. To give a merchant the updated settings, create a new form.
This design lets you:
- Define standard configurations once in templates
- Customize individual forms when needed without creating new templates
- Avoid repeating the same configuration for every form
- Update templates without impacting in-progress merchant forms
See Boarding Forms API Reference for the full list of override-able properties.
Form Types
Set the form type with type, on the template or on each form. A form's type overrides the template's.
| Type | Purpose |
|---|---|
| KYC (default) | Standard onboarding form for collecting merchant data |
| RFI | Request for Information form for collecting additional data after initial onboarding |
When autoTransmitMerchantData is enabled:
- KYC forms: Automatically initiate merchant onboarding upon submission
- RFI forms: Automatically patch the new data to the connection
Expiration Best Practices
Form links expire after the configured expirationInHours duration. Consider these factors when setting expiration:
- Security: Shorter expirations reduce the window for unauthorized access to form links
- User experience: Merchants need enough time to gather required documents and information
- Use case: Self-service signup may need longer durations; sales-assisted flows can use shorter ones
Recommendation: Use the shortest expiration that supports your use case. For most scenarios, 24-72 hours provides a good balance.
When a form expires:
- The link redirects to your
expirationUrl - Partially completed data is preserved on the merchant record
- Generate a new form link to continue data collection
Auto-Transmit Behavior
When autoTransmitMerchantData is true:
- Merchant completes all form sections
- Merchant clicks Submit on the final Review page
- If all requirements are satisfied, Preczn automatically:
- For KYC forms: Initiates onboarding (connection status changes to
Queued) - For RFI forms: Patches the data to the connection
- For KYC forms: Initiates onboarding (connection status changes to
Submit Button RequiredAuto-transmit only triggers when the merchant clicks Submit. Completing fields without submitting does not trigger the automatic action.
When autoTransmitMerchantData is false (default):
- Completing the form saves data to the merchant record
- You must manually initiate onboarding via Dashboard or API
When to turn on auto-transmitLeave auto-transmit off while you board your first merchants, so you can review each submission and start onboarding yourself. Once you're comfortable with what merchants submit, turn it on. Your operations team then no longer has to start each merchant's onboarding by hand.
Managing Templates
Viewing Templates
Templates are listed in the Dashboard under Settings → Boarding Forms. Each template shows:
- Template name
- Associated domain
- Form type (KYC or RFI)
- Test mode indicator
Updating Templates
Template updates apply to new form links only. See Template Inheritance.
Test Mode
Templates are environment-specific. Create separate templates for test and production modes to maintain isolated configurations.
FAQ
I updated my template. Why don't merchants see the change?
Existing forms keep the settings they were created with. Create a new form to give the merchant the updated version. See Template Inheritance.
Can each merchant's form use a different return URL or expiration?
Yes. Pass returnUrl, expirationUrl, or expirationInHours when you create the form. The values apply to that form only, and the template keeps its defaults. Point returnUrl at a page in your application where the merchant can continue, because Preczn can't sign the merchant in to your application.
What happens when a merchant opens an expired form link?
The form redirects the merchant to your expirationUrl. Data the merchant already saved stays on the merchant record, so create a new form to let them finish. Forms can last up to 2,160 hours (90 days). See Expiration Best Practices.
Can I rename a field label?
No. Field labels are fixed. To tell merchants what to enter, add subtext under the field.
Is there a character limit for subtext?
No. Long subtext wraps onto more lines and pushes the rest of the step down. Keep it to about 70 characters, and no more than about 120. See Length and Wrapping.
Can subtext include links, bold text, or line breaks?
No. Subtext renders as plain text. For longer or formatted instructions, use the Welcome Section.
Do I need separate templates for KYC and RFI forms?
No. Set type when you create each form. You can keep one template for your branding and use it for both form types. See Form Types.
Do my test-mode templates carry over to live mode?
No. Templates are environment-specific. Recreate the template in live mode after you finish testing.
Why doesn't my form show a Help button?
The Help button appears only when the template has at least one support setting: support.url, support.email, support.phone, or support.text.
Related Pages
- Boarding Forms - Overview and merchant experience
- Configuring Domain Names - DNS and SSL setup for custom domains
- Boarding Forms API Reference - API endpoints for templates and forms
Updated 5 days ago